
Newbs: Start here
Before you get started…educate yourself on the rating systems of climbing. This graph shows the most common systems used around the world:
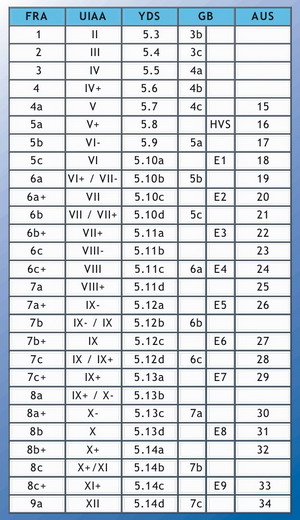
All the routes discussed on this site (and all of the roped routes in the state of Arkansas), utilize the YDS, Yosemite Decimal System, of rating routes. The smaller the number, the easier the route. Most climbers start between 5.5 and 5.7 before moving into 5.8-5.9 when becoming the occasional weekender. Very committed recreational climbers will commonly ascend 5.10-5.11 and 5.12-5.15 are dubbed for “true experts.” 5.10-5.15 utilizes a, b, c and d to more precisely state the difficulty of a route. Sometimes a plus or minus sign will be added to the rating to refine the classification even more.The YDS rating is based on the hardest move on a pitch and gives no indication of overall difficulty, protection, exposure, run-out or strenuousness.
If you’re new the the sport of rock climbing (much like I was less than a year ago), do yourself a favor and get acquainted with a few key aspects that can make or break your experience:

When climbing, the feet are just as important as the hands. Understanding smearing, heel-hooking and other techniques can aid in making the initial transition into climbing that much easier and those techniques cannot be accomplished without proper climbing shoes. After being around a slew of climbers, reading up a bit on the aspects of shoes and purchasing shoes myself, I’ve found that there are three key aspects to consider when choosing shoes.
Type of climbing
It is important to consider where the climb might take you. For beginners, an all-day comfort climbing shoe is the best choice because of its comfort and versatility. Typically these shoes have a flat-toe fit, heel cushioning and a thick, stiff sole. Other aspects of climbing that a climber may gravitate toward once they commit to the sport are steep face, bouldering, gym climbing and crack climbing. All of these aspects have a variety of needs that shoes can fulfill based on construction.
Shoe Closures
Another important aspect of shoe shopping to consider is the way the shoe is closed around the foot. This can be by lace-ups, rip-and-stick and slippers. Lace-ups are the most versatile style and are recommended for beginners. When the feet get hot and swell up, or for walk-off routes, the climber can loosen the laces. But for a difficult pitch or climb, they can crank down at the toe and instep to bump up the shoe’s performance. Again, versatility is key for newbies. Rip-and-stick closures offer superior on/off convenience. They are ideal for bouldering and gym climbing. Lastly, slippers with elastic closure systems offer the greatest sensitivity and lowest profile of any shoe. Slippers are fun for training—without a traditionally stiff sole and midsole, the feet will get stronger, faster. Their lower-profile is appreciated even by the world’s top thin crack climbers. They are also light, stowable and slip easily into a daypack or suitcase.
How They Fit
This is a confusing aspect of obtaining the best first pair of climbing shoes. Some of the best advice for fitting is to shop in the afternoon (when feet are often their largest and/or most swollen) and knowing the fit by trying them on. Key things to notice when trying on the shoes are:
1. Avoid “dead-space” between the toes and the inside of the shoe. During a foothold, the shoe will not stay rigid if there is dead space.
2. Make sure the toes are flat or comfortably curved and that the toe knuckles aren’t bunched painfully against the top of the shoe.
3. When are standing on the toe, ensure the back of the shoe doesn’t pinch the bottom of the Achilles tendon.
4. If a shoe is difficult to slip on the foot, it is probably too tight.
Lastly, the higher performance the shoe, the tighter the fit will be.

According to Climbing magazine’s latest 2012 Fall shoe review, the Five Ten Coyote VCS Canvas was ranked the “Beginner Bargain” and the Tenaya Tatanka was ranked the “One-Shoe Wonder” out of eight pairs that were reviewed. Each were declared special in some way depending on what area they excelled in, but those two particular pairs of shoes were dubbed excellent beginner shoes.
The Five Ten Coyote VCS Canvas: “Testers appreciate the pointing toe profile, which improves edge and pocket precision.”

The Tenaya Tatanka: “They’re not perfect at anything, but they perform really well everywhere, which makes them terrific for a fairly high-performance versatile shoe.”
Got the shoes picked out? Good.
_______________________________________________________________________________________________________________________________________

The second thing to consider if a climber’s plans involved roped climbing is a harness. Essentially, this tool “keeps you from dying” as many climbers joke but in reality is the piece of equipment that keeps the climber attached to the rope. This device fits snugly around the climber’s natural waist and upper thighs and keeps the climber at a safe distance from a fall from clip to clip (if one is lead climbing; top roping falls can be caught without any dependance of the next clip). Here’s a diagram to get acquainted with while reading specs of different harnesses:
 As a beginner, one will want to seek out a harness that has comfort features in the waistbelt and leg loops. Most beginners will be pausing a lot between moves to survey a route and will be laying back to put weight on these two areas. Since they provide the support as a climber moves up a route, comfort is an essential for those getting used to the sport. As advancements are made, one may shop for a thinner harness so as to not feel “constricted” by the extra padding of a beginner’s harness.
The second most important aspect of a harness to consider are the number of gear loops. Some have just two, some can have up to four. This number will really depend on the amount of protection needed and the length of routes being climbed.
Rock and Ice puts out an article every issue labeled [field tested] and the October 2012 edition listed the Black Diamond Momentum AL harness as the best budget beginner buy.

The Specs:
-Double back closure
-Dual core construction of the loops and belt.
-TrakFIT leg loop adjustment. {patent pending}
-Adjustable rear riser.
-4 gear loops.
-12kN-rated haul loops. (1 kN= ~225 lbs of force)
Notice Chris sporting the Black Diamond Momentum AL, in his choice color of Tequila:
_______________________________________________________________________________________________________________________________________

Most likely before one climbs, one will learn to belay. This skill is just as important, if not more important, than the climbing itself. Besides the harness, this piece of equipment keeps a climber as safe as humanly (and mechanically) possible. Assuming that the climber and belayer are all harnessed up and the climber is tied in, the belayer needs some way to hold on to the end of the rope. There are two different types of belay devices, a ATC and a Grigri.

ATC’s are used for lead climbing and top-roping and are considered the “manual transmission” of the climbing world. They require much more attention and response from the belay as the climber is ascending the route. Many climbers prefer this device over the Grigri because it allows the belayer to be more responsive to the climber by being able to take in and let out slack quickly and easily. Other positive aspects of this devices are that its lightweight, durable, easy to load and fairly inexpensive.

Grigri’s [as seen in the above graphic] are virtually “dummy proof.” They come with etched in instructions for how to insert the rope and act as assisted braking devices for when a climber takes a fall. Though this devices are widely used amongst younger climbers, they can lull the belayer into a false sense of security while monitoring the climber.
_______________________________________________________________________________________________________________________________________

The last piece of equipment needed when initially getting into the world of climbing is a chalk bag and chalk. The chalk itself is magnesium carbonate (MgCO3) which is a drying agent to help decrease moisture, reduce slippage, and increase performance while climbing. Its knowing in the climbing world to be rather addictive and one will notice typically as a climber is about to attempt the crux section of a route, they’ll reach into their “bag of courage” as a means to douse their mitts in preparation.
There are four different types of climbing chalk: block style, powdered, chalk-filled fabric balls and liquid chalk:
Block chalk is composed of pure magnesium carbonate without additives and usually come in packs of eight that weigh a pound total. Most climbing stores will sell a single individually-wrapped block for a buck or so apiece. Buying these blocks can be money savers because instead of putting the whole block in the bag at once, put half in the chalk bag and the other uncrushed half in a zip-lock plastic baggie, which can be kept in a one’s pack for replenishment as needed.
Powdered chalk is already crushed into a fine dust, which can be poured directly into chalk bags. Powdered chalk is often formulated by climbing manufacturers with drying agents to increase hand dryness and perhaps create a better grip on holds. Powdered chalk, however, is more expensive than blocks of chalk and can have a tendency to be messy and spill out of the chalk bag. Many indoor climbing gyms do not allow climbers to use powdered chalk since fine chalk dust lingers in the air, clogging both climbers’ lungs as well as the gym ventilation system.
Chalk-filled fabric balls are small sacks composed of porous mesh material that are filled with powdered chalk. Chalk balls are definitely the best type of chalk to use for indoor training at climbing gyms and many require these balls rather than loose chalk since the chalk is easily applied to a climber’s hands, chalk dust is minimized in the air, and chalk is less easily spilled. Some climbers use a chalk ball when climbing outside but also add loose chalk to their bag so that they can dip their hands and get a complete chalk coating. Chalk balls also last longer than loose chalk since the chalk is contained and there is a tendency to use less of the stuff.
Liquid chalk is a specialty chalk product specially designed for climbers in gyms or indoor facilities. Liquid chalk is simply squirted onto the palms, spread throughout the hands and fingers, and then allowed to dry. It’s best applied before a climbing or bouldering session. Most climbers also use a minimal amount of regular gymnastic chalk along with the liquid stuff while climbing. Some overall advantages to liquid chalk are that its easy to apply, lasts longer than regular chalk, avoids clouds of white dust, and minimizes the number of times fingers are dipped into the chalk bag. Aspects like these could make a difference in climbing competitions or redpoint attempts on a hard route.
A chalk bag, the piece of equipment used to hold the precious stuff, comes in a variety of shapes and sizes. Usually one will pick out a bag based on boulder or roped climbing (boulderers don’t wear harnesses, thus needing a webbing belt to secure it around their person) and the size of their hands. Most roped climbing specific bags have a drawstring closure to help reduce chalk leakage while ascending.
_______________________________________________________________________________________________________________________________________

Ready to buy a rope? Typically most beginners don’t find themselves buying a rope right away. Mostly because they are climbing with groups of experienced climbers that have handful of ropes and are used to taking out 5-6 climbers at a time on trips. The second reason a rope isn’t a “right off the bat” purchase is because of the price tag: ropes are the most expensive investment related to climbing and the quality of rope purchased shouldn’t be compromised on in regards to budget. This author has had some experience with different types of rope, but not enough to comment on the variety at this time.
The next step is to learn techniques:


Leave a comment